How to Remove Roller Brush from Shark Lift-Away Vacuum
Removing the roller brush from a Shark Lift-Away vacuum is a common task that many owners may need to perform. If you’re wondering how to remove the roller brush from your Shark Lift-Away vacuum, I’ll walk you through the process step by step.
Firstly, make sure your vacuum is unplugged for safety. Then, locate the brush roll cover on the bottom of the vacuum head. It’s usually secured with screws or clips. Use a screwdriver or release the clips to open the cover and expose the roller brush.
Once you have access to the roller brush, carefully lift it out of its housing. In some models, there may be additional tabs or locks that need to be released before removing it completely. Take note of how the belt is positioned around the brush so that you can easily reassemble it later.
Removing and cleaning the roller brush regularly can help maintain optimal performance and prevent clogs caused by tangled hair or debris. Remember to consult your user manual for specific instructions tailored to your Shark Lift-Away model.
Removing the bottom plate of the Shark Lift-Away vacuum is an essential step in accessing and removing the roller brush. Here’s a simple guide on how to remove the roller brush from your Shark Lift-Away vacuum:
- Power off and unplug the vacuum: Before getting started, ensure that your vacuum is turned off and unplugged for safety purposes.
- Locate the bottom plate: The bottom plate is usually located on the underside of the vacuum head. It covers the roller brush compartment and needs to be removed to access and remove the roller brush.
- Check for fasteners or latches: Depending on your model, there might be screws, clips, or latches holding the bottom plate in place. Look for any visible fasteners around or near the edges of the plate.
- Remove fasteners: If there are screws, use a screwdriver to carefully loosen and remove them. For models with clips or latches, press or release them as instructed by your user manual or manufacturer guidelines.
- Take off the bottom plate: Once all fasteners are removed or released, gently lift up and remove the bottom plate from its position on top of the roller brush compartment.
- Clean or replace roller brush: With access to the roller brush now available, you can either clean it thoroughly using a pair of scissors to cut away any tangled hair or debris, or replace it entirely if necessary.
- Reassemble everything: After cleaning or replacing the roller brush, reattach it securely back into place within its compartment. Then carefully align and put back the bottom plate onto its original position until it clicks into place.
Now that you know how to remove the roller brush from your Shark Lift-Away vacuum by removing its bottom plate, you can easily maintain and keep your vacuum functioning optimally for effective cleaning performance! Just remember to always consult your user manual for specific instructions related to your model before attempting any maintenance or repairs.
Taking out the Roller Brush from Its Housing
When it comes to maintaining your Shark Lift-Away vacuum, knowing how to remove the roller brush from its housing is essential. Whether you need to clean or replace the brush, this step-by-step guide will walk you through the process.
- Prepare for Safety: Before starting any maintenance task on your vacuum cleaner, it’s crucial to ensure safety. Unplug the vacuum from the power source and allow it to cool down if it has been recently used.
- Accessing the Roller Brush Housing: To access the roller brush housing, locate the floorhead of your Shark Lift-Away vacuum. Depending on your model, there might be release buttons or levers that allow you to detach the floorhead from the main body of the vacuum.
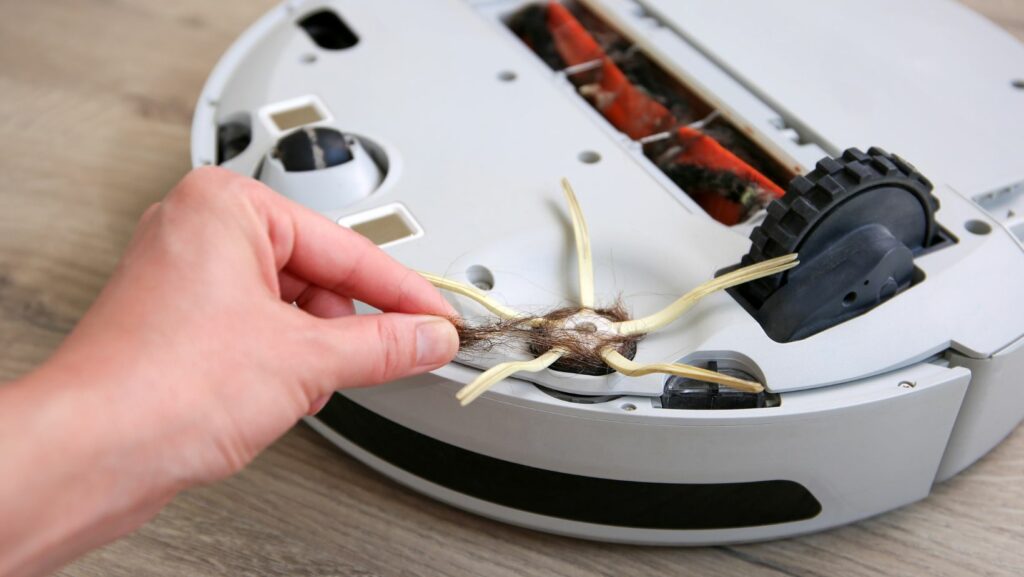
- Remove External Obstructions: Inspect both ends of the roller brush for any tangled hair, debris, or other obstructions that might impede its removal. Use a pair of scissors or a tool with a thin edge to carefully cut away any tangled threads or hair around the brush.
- Release Locks or Retainer Clips: Many Shark Lift-Away vacuums have locks or retainer clips that secure the roller brush in place within its housing. Look for these mechanisms and find suitable ways to release them—this may involve pressing buttons, sliding levers, or flipping clips.
- Detach and Clean Roller Brush: Once you’ve released all locks and retainer clips successfully, gently pull out the roller brush from its housing. Take note of how it was positioned before removing it; this will aid in reassembling later on.
Inspect both ends of the roller brush for built-up dirt and debris accumulation. Using gloved hands or a cleaning tool like tweezers or a toothbrush, remove any visible clogs that might affect performance.
- Reassemble and Secure: After cleaning or replacing parts as necessary, carefully reinsert the roller brush back into its housing. Make sure to align it properly with any drive belts or other mechanisms that may be present.
Secure the roller brush by locking the retainer clips or engaging any release buttons or levers you previously disengaged.
- Test and Verify: Once you’ve completed reassembling the roller brush and securing it in place, it’s time to test your Shark Lift-Away vacuum. Plug it back into a power source and turn it on to ensure smooth operation of the roller brush.
By following these steps, you can remove the roller brush from its housing in your Shark Lift-Away vacuum efficiently. Remember, regular maintenance of your vacuum cleaner will help prolong its lifespan and maintain optimal performance.